 Overview
A wooden mallet is one of the most essential tools in any woodworker’s shop. It’s ideal for chisel work, joinery, and tasks requiring controlled force without damaging your tools. This guide provides a technical drawing and step-by-step instructions for building a durable wooden mallet using basic materials and tools.
Materials Needed
- Hardwood (e.g., maple, oak, or ash)
- Wood glue
- Sandpaper (120–220 grit)
- Optional: wood finish or linseed oil
Cut List
| Part | Dimensions |
|---|---|
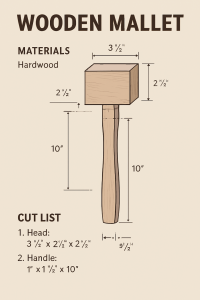
| Head | 3 ½” x 2 ½” x 2 ½” |
| Handle | 1″ x 1 ½” x 10″ |
Technical Drawing Summary
The mallet consists of two main components:
- Head: A rectangular block with a mortise cut to fit the handle.
- Handle: Tapered for grip, with a tenon that fits snugly into the head.
The mortise in the head is 2 ½” long and 1″ wide, matching the tenon dimensions on the handle. The handle tapers from 1″ at the top to 1 ½” at the base, with a thickness of ⅝”.
Step-by-Step Instructions
1. Cut the Head
- Use a hardwood block measuring 3 ½” x 2 ½” x 2 ½”.
- Mark and cut a centered mortise (2 ½” x 1″) using a drill and chisel or router.
2. Shape the Handle
- Cut a 10″ long piece of hardwood.
- Taper the handle from 1″ at the top to 1 ½” at the bottom.
- Shape the tenon to fit snugly into the mortise.
3. Dry Fit and Adjust
- Insert the handle into the head to check fit.
- Sand any tight spots and ensure the handle seats flush.
4. Glue and Clamp
- Apply wood glue to the tenon and mortise.
- Insert the handle and clamp until dry.
5. Finish
- Sand all surfaces smooth.
- Apply a wood finish or oil for durability.
Tips for Success
- Use hardwood for longevity and strength.
- Ensure tight joinery for a solid mallet.
- Customize the handle shape for comfort.
Conclusion
This wooden mallet plan is perfect for DIYers looking to build a reliable shop tool while practicing joinery and shaping techniques. With clear dimensions and a simple design, it’s a great beginner project that yields professional results.
For more technical drawing guides and woodworking plans, visit https://technicaldrawing.us.