 Overview
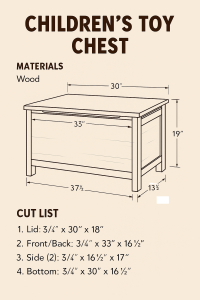
A children’s toy chest is a practical and charming addition to any playroom or bedroom. This project is ideal for beginner to intermediate woodworkers and offers a great opportunity to practice joinery, panel construction, and finishing techniques. This guide walks you through the process of building a sturdy toy chest using the technical drawing provided.
Materials Needed
- Plywood (¾” thick)
- Hardwood for trim and legs
- Wood glue
- Screws or nails
- Hinges (2)
- Sandpaper (120–220 grit)
- Wood finish or paint
Cut List
| Part | Dimensions |
|---|---|
| Lid | ¾” x 30″ x 18″ |
| Front/Back | ¾” x 33″ x 16 ½” |
| Side (2) | ¾” x 16 ½” x 17″ |
| Bottom | ¾” x 30″ x 16 ½” |
Step-by-Step Instructions
1. Cut All Panels
- Use a table saw or circular saw to cut all pieces according to the cut list.
- Ensure edges are square and smooth.
2. Assemble the Box
- Attach the side panels to the front and back panels using wood glue and screws.
- Reinforce corners with hardwood legs or corner blocks if desired.
3. Install the Bottom
- Fit the bottom panel inside the box frame.
- Secure with glue and screws or nails.
4. Attach the Lid
- Align the lid with the top of the chest.
- Install hinges at the back, ensuring smooth opening and closing.
5. Sand and Finish
- Sand all surfaces thoroughly.
- Apply wood finish, stain, or paint as desired.
Optional Features
- Add soft-close lid supports for safety.
- Install handles on the sides for easy lifting.
- Decorate with stencils or decals for personalization.
Conclusion
Building a children’s toy chest is a rewarding project that combines function and creativity. With clear measurements and simple joinery, this chest can be completed in a weekend and customized to match any room décor. For more woodworking plans and technical drawing guides, visit https://technicaldrawing.us.